How to Create an Instagram Private Account (Step-by-Step Guide)
Do you post personal photos on Instagram where you have thousands of strange followers? Are you concerned about the safety of such visual stories?
People can’t download photos from Instagram-like sites. But they can take screenshots of the picture and use it as they like. This’s the situation for all images you uploaded on the web as public. So either you avoid posting of private photos on social sites or stop accepting strangers as your friends there.
Instagram is our favorite site to post photos, videos, and collect feedback from followers. We upload and share various kinds of content there including those from the family, vacations, events, or others.
Today, we’ll see how to create a private Instagram account or convert your existing account to private in a few minutes.
Step 1: Create an Instagram Private account
Sign in to your Instagram account first. Follow these steps to create an Instagram private account.
Tap the gear icon on your profile to open Settings and choose ‘Privacy and Security’ from the popup box. A new page will open with relevant settings to safeguard your Instagram privacy.
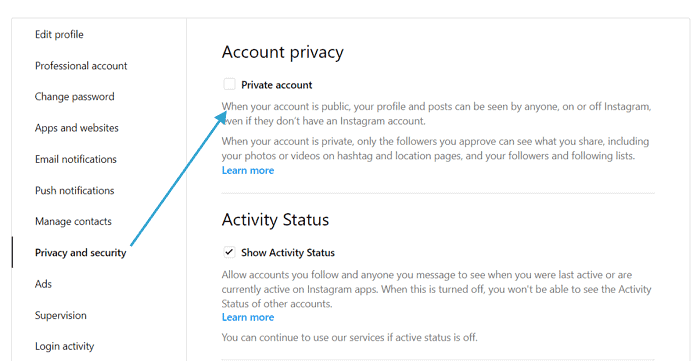
Check the first ‘Private Account’ option to make your account private. Once it enabled, no one can follow you without your permission.
If someone attempts to follow, Instagram will notify you through the Activity tab. You have to approve such requests to add them to your network. If not, they can’t see the photos and videos you post on the photo-sharing site.
Step 2: Manage your activity status
Scroll down through the same page to enable or disable your activity status, and manage other settings.
Instagram shows your activity status on the apps and thus lets others know when did you come online last. Disable the option to hide your status. Thereafter, you won’t be able to see the activity status of other accounts as well.
Step 3: Story settings
Go to the next section and click ‘Edit story settings’.
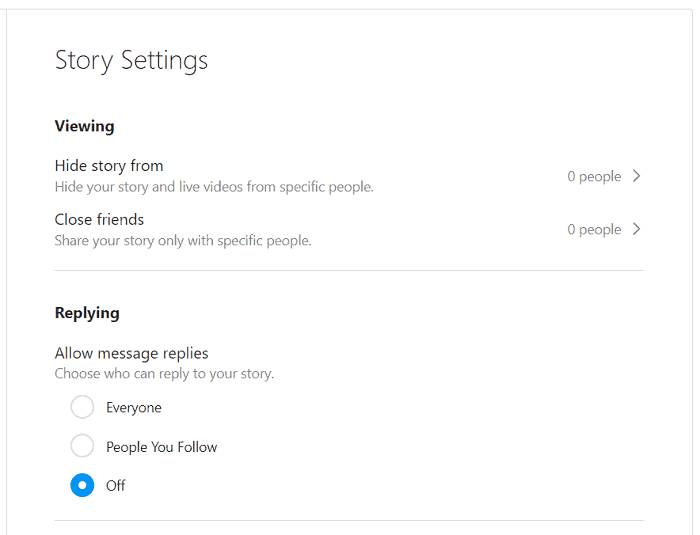
A new page will open with options to manage your story visibility, message replies, and more.
If you want to hide stories and live videos from specific people, open ‘Hide story from’ option and search for people from whom you need to hide Instagram stories.
Select appropriate accounts from the suggested list and you are done. Instagram will automatically hide your stories from them.
To share your stories with selected users, use the ‘Close friends’ option. Add accounts to your list, and they will be able to view your future Instagram stories.
Scroll down again to manage message replies and the sharing part. Select ‘Off’ to disable commenting on your stories or ‘people you follow’ to limit responses.
Step 4: Comment settings
Go back to the Privacy and security settings and click ‘Edit comment settings’ to configure your comment controls.
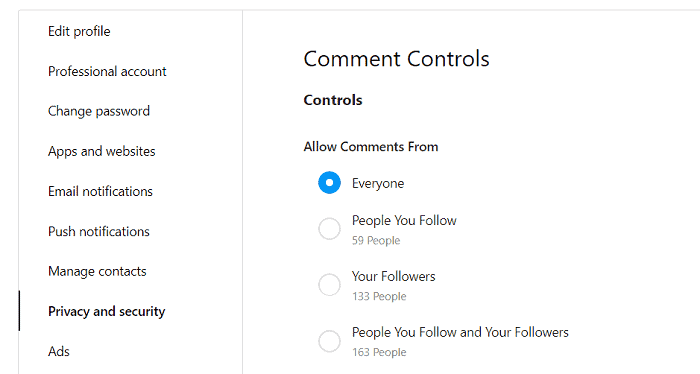
Instagram allows you to accept comments from everyone, the people you follow, your followers, and both. You can also block specific users if needed.
Do you want to block a friend on Instagram without letting them know? Just visit their profile.
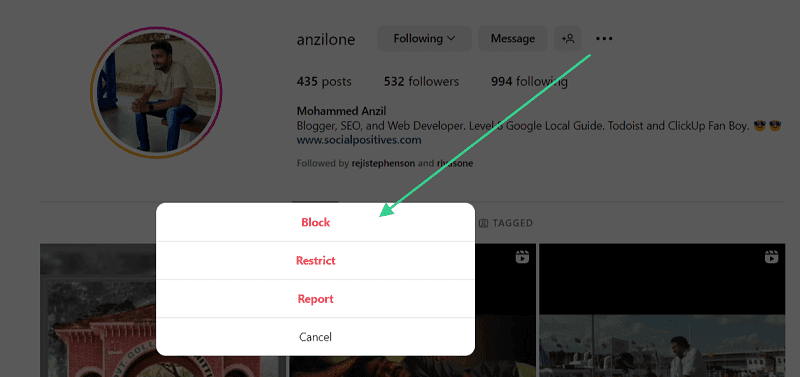
Tap the three dots on the right end of their username. Choose ‘Block’ from the popup box. That’s it. Instagram won’t notify the person that you have blocked him or her.
Again, go back to Privacy and security settings and scroll-down through the main screen to configure other parts for your Instagram private account.
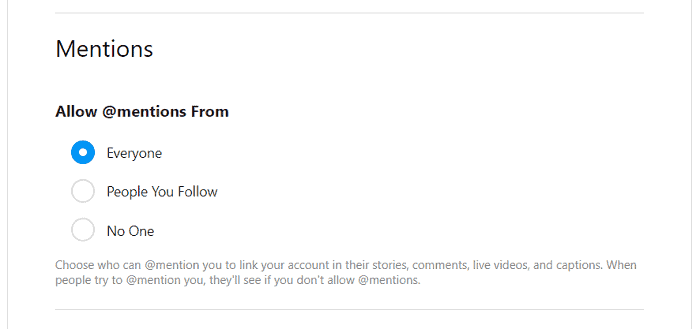
Anyone on Instagram can search for your account and mention you in their posts. To get mentions from only those people you follow, select ‘People You Follow’ option or to disable mentions, pick the ‘No One’ option.
Move to the next, ‘Guides’ section to allow or prevent people from using your post on their content. If you allow, others can see your Instagram username in the shared content.
Scroll down to the ‘Posts’ settings to set who can tag you in their Instagram posts. To disable tagging, pick the ‘No One’ option.
Step 6: Set messaging controls
Next, set messaging controls for your Instagram private profile.
Click ‘Manage message settings’ on the same page and you will see a new screen like this,
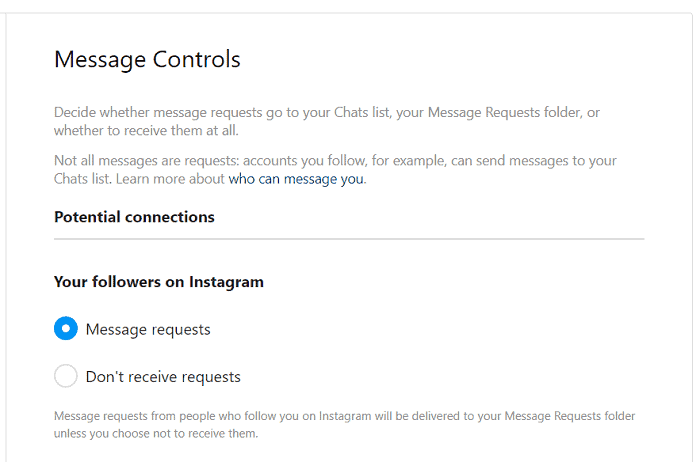
By default, people you follow can send messages to your chats list directly. Instagram will send messages from your followers to your message requests folder also. But you can disable messages from the followers, so they can interact with your Instagram posts, but they can’t send you private messages. For that, pick ‘Don’t receive requests’ option under Your followers on Instagram,
Scroll down to the bottom to manage message settings for your Facebook connections and also, group memberships.
Finally, visit Privacy and security settings once again to enable advanced comment filtering on your Instagram private account and hide comments or message requests that contain offensive words.
This is how an Instagram private profile appears to others,

Neither photos nor stories will be displayed to your non-followers. They will see a message that ‘This account is private’ on your profile page. Once you approved their follow request, they can start seeing your posts as usual and respond to them.
Are you looking for other private account options? Read these contents:


Hi, Manoj,
With so much happening about online privacy, it is now more important than ever to take control of what we share, how we share, and who sees them.
Your tutorial on how to make an Instagram account private is helpful, especially as more and more people now worry about this privacy.
Thank you for sharing.